Friday 20 May 2011

13th May 2011

(Blogger was offline for this date)

Yo!
Today id the final day of UDK, and I started playing around with the physics. I had to select my static mesh in the Conent Browser, and added to the stage as a Rigid Body. This made the static meshes have physics. I added some barrels, pots and flowers that all have physics and can be fired around the level. I also changed my planks to be rigid body, so this makes the game harder, when the players remove the planks to the health pickup.


After playing around with the physics, Dave started to help me with my wind turbine, again. At first he started by combining all the parts of the wind turbine together, and created a skeleton. After using smooth bind and painting the weights, the animation didn't work as well as it should. So, Dave separated all the parts, and combined all the blades togather, the body and fin together and then binded them all together with the skeleton. After painting the weights, he tried it again and animated it. At first we tried a short animation, and exported it using axmin to export the animation. In the UDK Content Browser, we uploaded the wind turbine into UDK, and added the animation using the animest. When we tested the animation, Dave decided to make the animation better, and he made it longer and loop smoothly. With the new animation, we added it into the level.


I handed in my level today! So now, all I've got left is the paperwork.


As today is the deadline, my production schedule is that I hand in the level, which is near enough done. So it will be ready to hand in at the end of the lesson or eariler.


Friday 6 May 2011

6th May 2011 - A week to go!

Yo!


One week left until hand in, and today is about the final details. At first I added a particle system of bugs, yes bugs. The particles was already on the UDK Content Browsers. I set the bugs in the garden. The bugs simply fly around the plants adding a little extra to the scene. After adding the particle system, I retried the Kismet door, and following the same method I did in Blog enter (Level Design, Friday 11th March 2011) and my door still doesn't work, so, the plan is to have the door open all the time.

After adding more bugs and positioning the doors, I had a play through with my level and now I'm going to create the bot's path. I use the path node actors. I tested my level with bots, and I felt really left out, I was sat at the top of the one building, watching the AI, seeing if my path nodes worked, and well......they carried on fighting without me! Like so.


For my level design schedule, I said by the 23rd April, I should be working on my assets, adding them into the Level and creating the final little details, and well, at the moment, all my assets are in my level, though, I might have a look at my original design, and see if there are any assets missing, one I think is the air conditioner, but I know that is on the G Drive at college and will look into adding that in as well.


Playing around my level, I think there is enough in the level as it is, and I'm not going to include the air conditioner, as I said, there is enough in the level as it is, and I think if I add anymore, then it will become over crowded and players will lose space, made for playing.

After adding more path nodes, that follow one another, I retired the bots, testing with one, two then three, and the bots now go for ammo, health, jump boots, armour and weapons. The screenshot I took of the bots, shows the one trying to get health while the other goes for ammo, before the one dies.


Screenshot of all the path node apples.


After trying again and again with Kismet, it just doesn't want to work, so for the animation aspect for my level, I'm going to create a wind-turbine. For my Wind-Turbine, I started with a plain pole, this pole will hold the wind-turbine and blades on them. For the start of the wind-turbine, I created a cube, before selecting the back vertexes and scaled them down, to create the basic shape. I then extruded the other side's faces to create the holder for the fans. Then I created the tail fin, I created this with a cube, selecting vertexes and scaling one side up and scaling the other side down, to create the fin shape. I then had to scale the sides in to make it thinner.


This is the fan so far.


After creating the the pole and body, I went onto the blade. For the blade, I used a cube. I selected the vertexes to scale down one end, making it smaller. The other end was extruded out, making it bigger, extruding again to make it smaller. For the blade, I wanted to add an indentation in the blade, and for this, I selected the faces and cut them in the middle, selecting all the middle vertexes, and moving them backwards, to create the blade.


After duplicating the blades around, I then created joints, one joint connects to the blades, one joint to the cube, and one to the floor, the one bone holds them together, but doesn't joint to any part of the mesh. After trying to import it, it started having a problem, so I sent the model to Dave for him to look at, hopefully it will be fixed by next week

Thursday 14 April 2011

14th April 2011 - Half Term

Yo!

Today is one day of Easter Half Term. I was doing my animation work, but then decided to look into my UDK level. I had a play around, testing the new layout of the foliage and decided to look into placing more pick-ups in my level. I've placed another health pick-up, an armour pick-up and a jump boost (Don't ask, never tried one, wanted to) I've just looked around my level and I've added my wall textures to the outside walls, just in case the player falls that far down. Looking at my rooftop, it looks a little plain, I might add more buildings around the area, just for show, make it look more interesting and not a floating roof top. I might also adjust the rooftops themselves, and have the walls, reach the kill zone, instead of having a floating rooftop.

Right now, the buildings now reach the floor, and looks better, but, now the walls look boring and repetitive. So, I'm going to place in some windows. I'm thinking of adding them as decals, get a window, decal it, so I can place the windows in where I want, and as the player is falling, there's no need to go to close to them. I was just looking through my packages for UDK, when I came across a package we created during learning the software, for a window we created. I decided to copy all the materials and assets for that level into my level package and tried the Windows out on the buildings. Right now, I'm not very keen on the level as it is now, but I do plan on changing it in more detail and not rushed later on.

Friday 1 April 2011

1st April 2011

Yo!

Today I've been doing small details to my level, such as adding a plain to my level. I did this by going to the 360 cities website on http://www.360cities.net/image/empire-state-building-panorama-manhattan-new-york-city#58.40,30.20,70.0 which gave a 360 view from the Empire State Buildings. I was able to change the views of the city, looking around, adding different camera effects like Fish Eye and also a planet view, which made the image look like the sky dome, which I saved a screenshot of and tried to create a few more sky domes using the dome and material for the original one. I also tried to create a sky dome for the floor, to make it look like the player is looking down. After tyring to create one, I decided to make a white-box square and placed a material of a bird-eye-view on the plain and created the look of a city beneath, like so.


After playing the level a few times with the new plain, I realised the water towers simply hovered on the level, so I created a small ledge to hold the towers on when the player looks at them. Like so...


After playing the level through, I decided to add more foliage to the level, by coping the plants and pots from other levels and added them to other areas and in different cominations. Like so.

Friday 25 March 2011

25th March 2011

Yo!
Today didn't start off good. My project package had become a TMP instead of the UPK file and so my project wouldn't load, meaning I had to create a new project. Luckily for me all my assets are available and I can re import them into my package and recreate the materials again.
Upon recreating my materials, decals and static meshes I had to re import them into the level.
I decided to try and make a sky dome for a city scape. I found a tutorial on you tube: http://www.youtube.com/watch?v=ldhsrIhL7kE&feature=related. The creator is 3dmotiveLLC and was creating a sky dome from a panoramic photograph. Following his tutorial I had to change my image size to 1024 by 1024 . This stretches the image, then we have to go to filter - distort - Polar Coordinates before saving the file as a Targa 24bit/pixel, creating this image below.


After creating the targa, I had to create the dome. I did try following the 3Ds Max way of creating the dome, but it wouldn't work, so I had to use Maya instead, making it much easier.
In Max, I was suppose to create a sphere, cut off half the sphere, before adding a texture of the scape before wrapping the UVs. I got really really lost, and my advice, DON'T USE MAX!!! Unless you can! So, following this technique in Maya, it was easier to understand, create a sphere, cut half the faces, then UV map it on the Y axis, before adding a phong and adding the texture onto the sphere before reversing the texture and
saving it as ase using the axmesh mel command.


After creating the sky dome, I went ahead and created a better sky dome design, using the same buildings, but also a sky I found on Google. I selected and deleted the old sky from the New York City scape, and place it over the sky. From there I followed the same properties of a 1024x1024 pixel image before, before adding the Polar Coordinates to create the circular imagery. From there I saved as a Targa and imported it into UDK. At first I loaded the new texture into the material I made, but then it was too dark, so I used one of UDK's default, saved it as a copy, before adding my new texture in, making the image below.

Friday 18 March 2011

Assets

Yo!
Today I will be continuing my assets by using my crazy bump maps to add texture and depth to my models.
I've completed adding better textures to my assets and have now started to create my kismet door using the guide from last week. I still have problems with the door opening as it still doesn't. I've tried looking at the different properties settings, but can't find anything that works.
After talking to Dave, I still can't work my door and have decided to go onto my water.

I created the water by creating a box brush and positioning it on my level. After that, I went into the content browsers, under the actor classes and found a FluidSurfaceActor, before adding it to the brush. Then I had to scale it to the size of my swimming pool before adding a water material from the UDK Content Browser. I used You Tube to find a tutorial from Raven

(http://www.youtube.com/watch?v=iryqaziFgE) and followed his tutorial.


My level with my swimming pool with material, plain and volume.


This is the properties to add the water material to the fluid surface actor.


To my water volume, I added a damage properties with the player will lose health by drowning.

For my swimming pool, the water did over flow onto the map, which looked really out of place and didn't work as well as it should, so I replaced my fluid surface actor down so it looks as if the water is in the pool.

After testing my level out with the swimming pool. I decided to change around the actors and add actors for pick-ups. To do this, I went onto the content browser before changing the tab to actors and searched pick-ups. From there I found weapon, armour and health. Selecting one of the pick-ups, I pressed A and clicked on a location to place the pick-up. For the weapons, I needed to change the properties and select the weapon I needed.

In regards to my project schedule, I'm still working on my visual target and am still improving them. I said last week I will be creating my assets materials and make them better using the maps I created from Crazy Bump and continue to create my visual target. In regards, I have completed creating my materials with my crazy bump maps and have continued to make my visual target. Next week I'm still planning on creating my visual target and making them better.
Chow!

Friday 11 March 2011

Level Design

Yo!
Today I loaded up my level, for all the textures and static meshes to disappear! Meaning I spent around a hour reloaded all my textures and decals. The decals was easy to reload, as all I had to do was use F4 to bring up the properties and reload the decal material. I managed to place my driving board into my level. I had to go into Maya, got to windows - settings - plug-in manager and auto load and load the ActorX plug-in to use the axmesh. With the diving board in my level, I'm now watching a video tutorial of Kismet. I'm using the tutorial to learn to create a moving door, I'm placing in my level. At the moment the video shows how to create a sliding door in the level, but I'm planing to change a few setting so the door rotates.

Creating my kismet door
I had to place a InteractiveFoliageActor on the floor where my door was going to be, while having the door selected in the Content Browser. After that, I had to place a trigger on the floor in front of my door. Then I had to scale my trigger to a collision height of 60 and a collision radius of 30, before placing the bottom of the collision on the floor and centred the trigger in the middle of the door. Once I created the set up, I then opened Kismet.

I opened up kismet and created a Trigger_0 Touch. I then had to turn the Max Trigger Count to 0, this means my door will open and close each time. Once I set up the trigger, I had to create a Meatinee sequence in Kismet. I had to connect the touched box from the trigger to the play in matinee before double clicking on the matinee to open up the matinee. Then I had to select the door and Add New Empty Group. Once I named it OpeningDoor, I had to right click on the group and add new movement track, that automatically sets the first keyframe ready for animation. I then had to drag the time slider, located at the bottom of the matinee, and place it at one second before hitting enter. Once I hit enter I was in Adjust Key mode, where I can now open my door.

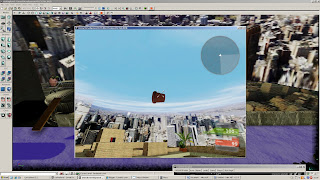
Here is the kismet, matinee and my door partly animated.
Once I cut the animation down from five seconds to one, I had to close down the matinee. Then I connected the untouch node to the reverse, this means when the player isn't anywhere near the door, the door will close by itself.
I tried the door in real time, but my door won't open at the current settings so I'm having to change the settings. After reading the warning, I changed the physic mode of the door to PHYS_Interpolating. Even changing the Physic mode the door still didn't open. I've tried the door several times but the door still doesn't work. I've added different start points in my level, one in each area, one ontop of the buildings, one inside my small building, one by my swimming pool and the other one inside my garden.
Project Schedule
For my project, I had to create a schedule with dates and tasks
The whitebox level must have been finished by the 28th January. I choose this date and task as they was the first task to be completed. I already created my whitebox level during my design process. The whiteboxed level is designed to test playability, scale and is made to be very basic. I managed to complete this before the date of the 28th January so I was ready to go onto the next stage.
Visual Target is the next stage of the production. The visual target is designed to test the look of one area of the map before completing the level. At the moment I am currently working on the Visual target (11th March), but I did state I would of completed the Visual target on the 18th February. On the 18th February I was creating my assets for my level, leaving me around three weeks behind on the visual target deadline.
Assets was going to be completed for the 1st April, but I'm completed making my assets on the 4th March, meaning I'm a month ahead of myself in terms of that deadline. I was working on my assets when I should of been working on my visual target, but now they're in my level, I can now work into creating my visual target and making it look better. I did write in my schedule I would of finished my assets by the 22nd April, but because I've manged to complete my assets before the deadline for my visual target, I've changed my schedule around with my visual target and my assets.
The deadline for my level is the 13th May. As of today (11th March) I have eight weeks left of the project with two of those weeks a half term. By the 13th May I need to complete the whole level.
Today I tried to create my kismet door which didn't work and I ended up deleting it, I will try again to create my kismet door, and because I had written down the instuctions so I can follow them for the next try. I also used Crazy Bump to create my normal, diffuse and specular maps. I did load the all into my package and place them in my materials to forget to save my package and level before UDK crashed, making me lose all the new materials. So, my task next week is to create the materials again and continue to create my visual target. I should be working on creating my assets, but because I have already completed them, I will have to backdate my work and work on my visual target for the next few weeks.
Next weeks tasks
Next week I will be making my materials better with the maps I created with Crazy Bump and place them onto my static meshes and continue to make my visual target.
Chow!